I think this is probably my most exciting creation yet! A reversible tote bag!!! I'm so excited about it that, while I was doing the final stitches, I was yelling triumphantly. Not kidding.
Anyway, you should know that I got the tutorial to make said lovely bag over at Sew Caroline, a blog I really love. She has so many cute ideas and I can't wait to try another tutorial.
As I mentioned previously, this bag is for the little Duck. Since she is about two and a half, I decided to take the measurements in the tutorial and cut them in half. She is a small human, you see. Fabric-wise, I used some cute remnants that I had picked up at Joann's when I first got my machine in August. It's easy to find cute fabric that would be good for a little person, so I was excited about my options. You may notice that the fabric I used for the bag straps I also used for the ties on the apron I made for her recently. She'll match, I guess.
So here is a picture of me sewing one part of the bag together. Just three sides at this point. The top will be sewn alllllll together at the very end.

And here are the straps, post sewing. I halved the measurements for those, too, but I think maybe I should have made them a bit longer. Thank goodness the Duck is pretty little. I think she can make it work.

After all of
the bag pieces were sewn and the straps were together, I had to attach
the straps to one part of the bag. Since everything gets sewn together
at the very end, one piece of the bag was left inside out (that part
will go inside the other part, which will be turned right side out
before the final sewing). I attached the straps each about 2.5 inches
from the sides of the bag.

I used, per Caroline's instructions, a zig zag stitch and went over each strap a few times to give them some stability. The first one I did, I started the stitch over a couple of times. The second one, I realized I could just backstitch and then go forward again and that looked good, so I did that several times for each remaining strap.

After the straps were on both sides of the inside part of the bag, I had to press about half an inch toward the "wrong side" of the fabric on both pieces and then stick the inside part in the outside part. Does that make sense? It seems confusing after rereading it. Maybe not.

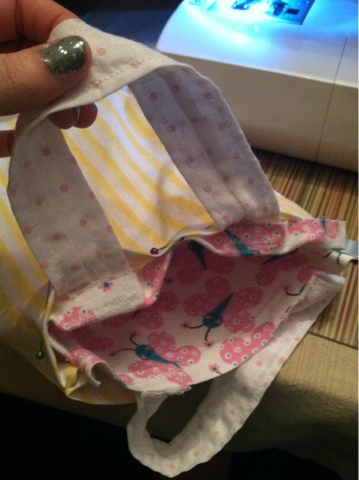
Anyway, once all of the bag pieces were together, I pinned the pieces together, making sure to pull the straps out. See?

And then I stitched everything together, just a bit below the top of the fabric. I realized that I could take part of my machine off and put the bag actually on the machine and just rotate it around for a nice, even stitch all the way around the top. Super proud of myself for that realization, let me tell you. So, without further ado, here is the finished product.
The butterfly side:

And the striped side:

Can we just talk about how awesome this is?? I can't wait to try out some full size bags. Maybe I can make some in time for Christmas gifts! That would be so awesome. I am also excited about all of the different fabrics I can use.
I demand one of these for Christmas.
ReplyDeleteI am also glad to see the Sparkly Thumb getting some screen time!
you did such a great job on it!! way to go, girl! you should try this skirt:: http://www.sewcaroline.com/2011/09/paper-bag-skirt-diy.html
ReplyDeletexo,
Caroline
Caroline- Thanks so much! I'm definitely planning to try the paper bag skirt as well as the color block skirt and the camera strap cover (and, let's be honest, everything else). I love reading your blog- keep up the good work!
ReplyDelete